Oh look, a birdy post! Just kidding! I have not seen any birds recently so this is about bread again. A blog correspondent asked about the recipe and process we are using for sourdough, who am I to refuse such a request? Sourdough is tough, I will be the first to admit that and it comes as no surprise that some people don't get on with it and have given up. It is a big faff that requires planning and some hands on work over a number of hours, but the new environment we find ourselves in with many of us working from home is ideal.
I can take no credit for what follows. Last year we went to visit J and J, good friends of ours from college days, and were stunned by a home made soup and blown away by a glorious loaf of bread. They not only gave us some of their starter but also wrote out this recipe for us. We have not adapted it, but we have learned which bits you have to get right and which bits are more forgiving. And the best bit? This is really cheap - there is no butter or ongoing need for yeast. The flour for a loaf is about 70p using a normal supermarket packet, and if you buy it in bulk sacks like we do it is more like 40p. Salt is 0.5p. What may become the biggest cost is turning the oven on for an hour - about 15p today but lord only knows where it will end up. But the point is that today at least you can make an amazing loaf for the same as it costs to buy a cheapest 'value' one in a supermarket. A sourdough loaf from the local artisanal bakery is £4.
Maintaining a Sourdough Starter
1. You need some starter. The best place to get some from is from someone who has some already!
2. Feed your starter at least once a week,1 part starter to 1 part strong flour to 1 part water.
3. All you need is one pot of it, you can discard the part you don't renew/feed. The starter should live in the fridge. It looks like gloupy milk.

Making Bread
1. In the morning the day before you want bread, mix 50g starter, 50g water and 50g strong flour in a clear jar and leave out on the kitchen counter for 4 hours with the lid on. It will roughly double in size so make sure your container is large enough.
2. At the same time as step #1, mix 600g strong flour with 375g water in a large bowl and also leave it for 4 hours, covered with a wet cloth. Our kitchen is probably between 18C and 22C. Your 600g can contain other flours, for instance you could go with part rye or wholemeal.
3. When the 4 hours is up, pour the starter mix into the big bowl of flour mix. Add 12-15g of salt and mix it well for about 10 minutes with a wooden spoon or similar. Cover and leave for an hour. Wash your mixing implement immediately before it solidifies.
4. When the hour is up, stretch and pull the dough a few times by hand and cover it again. Literally pull it flat, and then fold it back on itself. Turn it 90 degrees and then do it again until you have got round 360 degrees. Wash your hands well afterwards as it really hurts when tiny bits of dough dry on the hair on the back of your hands and fingers!
5. Repeat step #4 three more times, once an hour. The first and second times it will likely be quite sloppy and sticky. Once you get to the third stretching it will look and feel a lot more like dough. The photo below is just after the first stretching. Timing is not critical here, if I have a heavy afternoon of meetings it may be that I leave it three hours and it seems not to matter. This is where a warm environment helps, but it does not seem to be critical. My pet theory however is that the cooler it is the more flexibility you have in terms of timings.
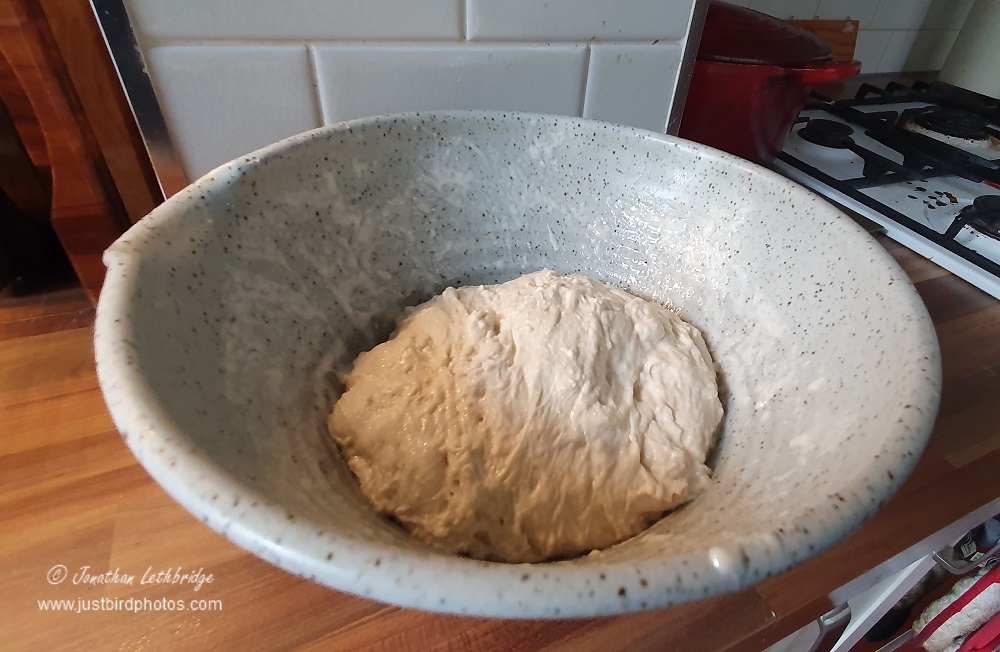 |
| After round one of stretching. You can also see the cooking pot in the background. |
6. After the final stretch, cover the dough again and put it in the fridge overnight, or 12-24 hours. If approaching a weekend, you can easily make a double recipe on the Friday and make one loaf on Saturday and another on Sunday. The Sunday dough would therefore spend more like 36 hours in the fridge but again it seems not to matter.
7. The following morning is baking day. The ideal time to do this is obviously before breakfast, so send your beloved downstairs to do it whilst you remain tucked up in bed. Put semolina into the bottom of a large cast iron pot that is oven-proof and has a tight lid.
8. Heat the oven to 270C (fan)
9. Shape the dough, stretching it to form a tight skin.
10.Spread flour over the top of the dough, a solid covering or a pretty pattern. Make a few scores with a sharp knife in the top, don't skip this step. Some people use a razor to make elaborate patterns.
11. Put it in the pot on top of the layer of semolina, put the lid on, and bake for 40 minutes.
12. Remove the lid at the 40 minute mark and bake for a further 10 minutes.
13. CONSUME!
 |
| Behold the finished article |
Challenge accepted but will struggle with the 270c!!!
ReplyDeleteApparently 250C also works fine with a fan oven.
DeleteMany thanks for this . Will give it a go much simpler than the Fearnley Whittingstall one I currently follow
ReplyDeleteIt is very straightforward, just a long wait start to finish. I reckon the total actual doing something time is probably around 40 minutes. 5 minutes to mix the flour and water, 5 minutes to bulk up the starter, 10 minutes to mix them together once 4 hours have elapsed. 4 x 2 minutes stretching, and then 10 minutes forming it into a loaf and making the patterns etc.
Delete